
If you stumbled upon this article by accident you can go to the course overview HERE and start from the beginning.
In this part we’ll learn…
…the incorrect way to extend the Rigify Meta Rigs 🙂
Here is the video to this chapter. More information and ideas can be found below.
I briefly mentioned this approach in Chapter 2 and called it the “Frankenstein” workflow.
What I mean is trying to copy and paste parts of the prebuilt rigs, in order to achieve a more complex rig structure. If you know what you’re doing there is nothing wrong with this. But when it’s done without a good basic understanding of the Building blocks (or Rig Types), it often leads to errors and confusion.
Here is an example of a character with many arms. In this case the copy-paste approach is likely to succeed since the arm is a relatively simple Building Block.

By the way here is a fun little video related to this character that I posted on my Twitter:
Here is a more complex example. A humanoid character with a tail. To rig this guy/gal with the “Frankenstein” approach would require to scavenge parts of a human and animal meta rig and combine them together. That could work but if you don’t know what you’re doing you are almost guaranteed to get errors. This exact example is shown in the video tutorial for Chapter 4 so be sure to check it out.
Something else I see in support forums all the time is people trying to selectively delete parts of the Rigify Face Rig and getting errors. You simply cannot do that. The whole face needs to be there or it has to be deleted entirely.

I am including this section as a warning. With this workflow you may have to spend hours trying to understand why your meta rig is not generating correctly or why you get one of Rigify’s cryptic errors.
Demo Rig 1 Horse with 6 legs and two tails
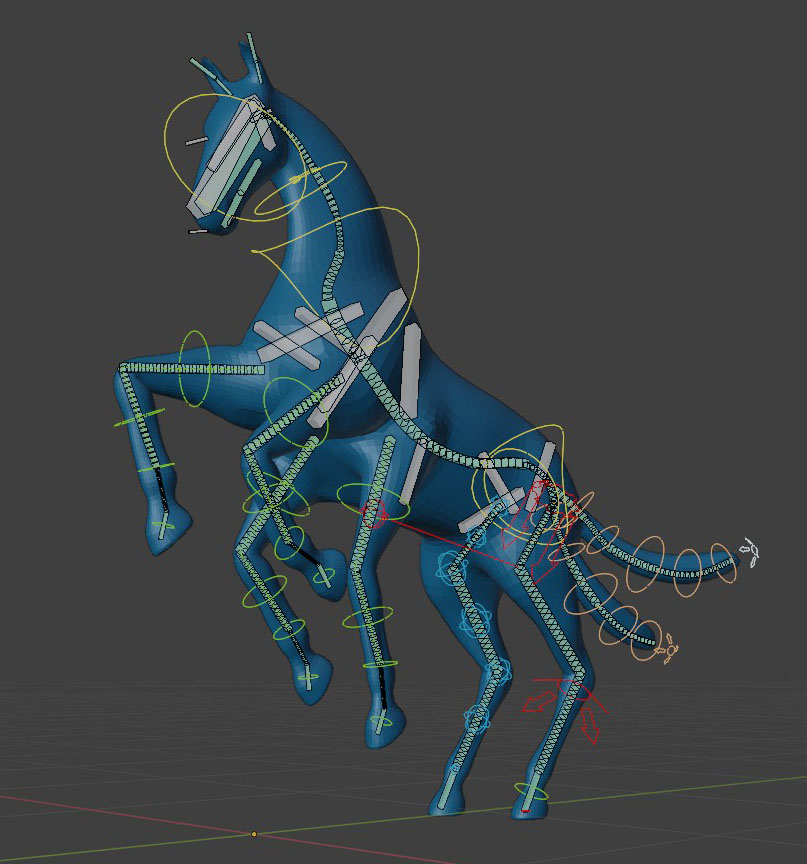
In this example we can achieve our goal by simply starting with the Horse meta rig and duplicating some of the existing bones. Namely the front legs and the tail. We then just align all rig parts to our character, hit Generate Rig and we should end up with a usable armature.
The exact process is shown in the Chapter 4 video.
One thing to keep in mind is that there is a bug in the Horse Meta Rig as of this writing (Blender version 2.82a). Some of the bones in the head area are parented incorrectly. This bug has already been submitted so I hope that it will be fixed soon. It is not difficult to fix tho: you just need to re-parent the eye, nose and jawbones to the Head bone (due to this bug they are parented to the left ear). This is also demonstrated in the video.
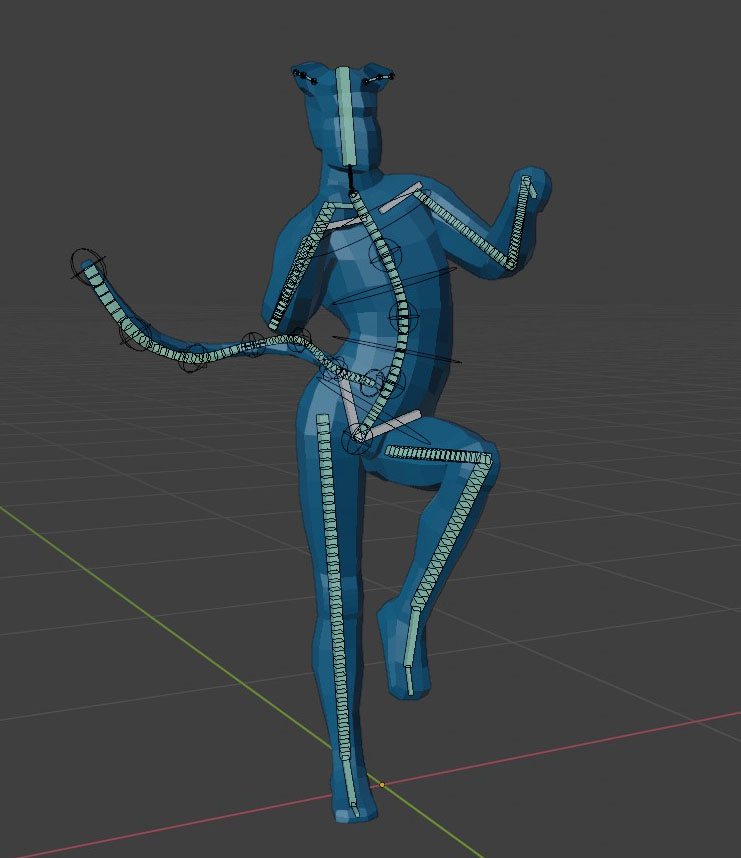
Demo Rig 2 Man with tail and ears.
The second demo is a human with tail and ears – or cat-woman if you will. I included it because I’ve seen people struggling with this exact setup. To “frankenstein” this type of armature you’d have to combine parts of more than one meta rig. We could use the Basic Human as a base and then try to scavenge a tail and ears from one of the animal rigs.
The animal rig that would create the least problems is actually the Horse since the ears in it are fairly simple.
But to make things more interesting I chose a more problematic one: the Cat Meta Rig.
To get started just create the Baisc Human meta rig. Then add a Cat meta rig to your scene. Go to Edit Mode for the Cat and delete all bones except for the tail and ears. In object Mode select both Meta Rigs and press Ctrl J.
There are several problem you may encounter:
Error: “Generation has thrown an exception: ‘NoneType‘ object has no attribute ‘bones’“
This one baffles a lot of people based on the help requests I see. There are many reasons that this weird issue pops up and if I understand correctly that’s actually a default Python error, rather than a Rigify one.
In this case you most likely forgot to parent the Cat’s tail to the Human spine.
The infamous “bone position is disjoint“ Error
We already dealt with this in the previous chapter. The spine and tail need to be perfectly aligned with each other or you’ll get the above error message.
Where are my ears?
Even tho we grabbed the ears from the Cat and attached them to the Human, you’ll see no ear controls after the rig has been generated. Bummer!
The problem here is that the cat ears are part of the Face Rig Type. As I said just a minute ago in this article you can’t selectively delete parts of the Rigify Face. If you do one of two things will happen:
- you’ll get no controls in your generated rigs. In other words Rigify will simply ignore the bones that remained from the Face Rig.
- Or it may produce the ‘NoneType‘ error above
Ready to learn how to create custom meta rigs the correct way?
I hope you see how trying to mess around with the Meta Rigs is a slippery slope. It seems easy and straightforward but you quickly find out that it’s an error-prone approach.
I hope this motivates you to learn to proper Rigify workflow. That’s exactly what we’ll cover in the next chapter.
Choose your next step!
Can you create a video demo that shows how to import a static .stl file, remesh it for rigging, convert to blender, section as required and then add the armature and bones with some tips.
There are tons of .stl static print models and it would be useful to use Rigify to within Blender to:
1) Import .stl or.obj
2) Convert to Blender optimal file
3) Remesh to low animation resolution
4) Create rig with standard armatures
5) Create rig with custom or Frankenstein rigs
6) Show posing
7) Show animation
I have a library of about 150 obj arms, torso etc and .stl parts, and I want to import them and rig them but they were made with very high polygon counts, I would buy a course that explained working with imported complex .obj and .stl models
Horse metarig bug, regarding the ears being connected to the eyes, is still in Blender 2.93.7 (LTS)
Yeah, they fixed it in 2.90 … then brought back the buggy rig again in 2.93. WTH? 😀
I agree with Chris Bella.. not necessarily .obj and .stl, but my issue is that we outsource a lot of 3d artwork from our 2d artwork, and the resulting meshes are not always ready for rigging. So, I end-up having to make a rig for something made by folks who apparently don’t always know what rigging requires.
Some of them appear to try and bump their triangle count to make the buyer feel like they’re getting a more complex model, but it’s pretty clear they’re just randomly smoothing stuff that didn’t particularly need it.
The bad object meshes fail during parenting to any bones, and despite following your “preparing your model” instructions, and various internet advice, I can’t always determine what’s wrong with the models, even some of the low poly count ones. I use your video as a sort of checklist, and it fixes quite a bit, but not always. Welding, merging vertices, etc, only gets you part way with some meshes.
I managed to “fake” fix some of them by scaling up the model x10, and then downscaling the rig by .10 . That sometimes works, but the scale discrepancy causes issues with other addons like “Faceit” (Shape Key based face rigs I use for importing face MoCap separate from body MoCap).
Separating the meshes “by loose parts” and then parenting them before rejoining works quite well, but then there’s areas that just fail. no matter what I do.
One thing I came up with was to use the C- select feature in Edit mode, and break the problem mesh into chunks using Separate by selection instead. First cut the mesh in half (or thirds.. it’s faster), test parent each half, then the part that doesn’t parent, get’s cut again, and try reparenting. Eventually, everything parents except for small areas that I’m stuck remodeling (if I can) which ruins the surface textures.. I’m also left being completely unaware of what is causing the issue, which means I keep running into it the “long” way instead of finding/fixing issues without a long time “troubleshooting/parenting in halves”.
I’d love to find a course/tutorial that got into more of the whole, “This mesh is a mess, but we have to rig it anyway” because that’s what I’m constantly dealing with, instead of “Well, model this part right, and then you just rig it like this..”
If you have very weird meshes, feel free to email them to me
https://cgdive.com/contact/
I am interested in this weirdness because as you say, a lot of the meshes found on the internet have problems. Sometimes I don’t understand how people achieve such a high level of messiness 🙂