
Rig Types: How Rigify REALLY works.
(This article is a part of the Rigify series: go to the overview page so you can start from the beginning. 🙂 )
The four chapters until now have been a necessary intro to rigging in general and Rigify in particular. With this chapter the real fun with Rigify can begin.
If you want to build custom rigs that can be adapted to any character you need to understand the information in this section. In particular you have to understand the Rig Types.
In the previous chapters I mentioned that Rigify works with Building Blocks: arm, leg, tail, tentacle, etc. Rig Type is simply the technical term for a Building Block.
Where are all the Rigify Tools?
Before we find out how to set up a Rig Type let’s explore where the the Rigify tools are located inside blender. Even tho I love Rigify the (dis)organization of its tools is a personal pet peeve of mine.
The main areas where you’ll find Rigify tools are:
- Properties panel > Armature Tab
- Rigify Buttons
- Rigify Bone Groups
- Rigify Layer Names
- Properties panel > Bone Tab
- Rigify Type
- N-Panel (tools for posing and animating your final rig)
- Rig Main Properties
- Rig Layers

Our focus at this stage is on creating custom meta rigs so we can leave the N-Panel options alone. These are helpful once you start posing and animating your character.
We can also ignore Rigify Bone Groups and Rigify Layer Names. These two help you generate a rig that is more User friendly. The upcoming Chapter 7 is specifically focused on these tools.
So we’re left with just two areas of interest: Rigify Buttons and Rigify Type.
Disapearing Interface Elements
It’s important to keep in mind that these two areas disappear or change depending on the Armature “mode” (Object/Edit/Pose mode) that you’re in. This is a peculiar feature of blender’s interface that I am not very fond of… but I digress. Here is what you need to know:
The Rigify Type field only appears in Pose mode.
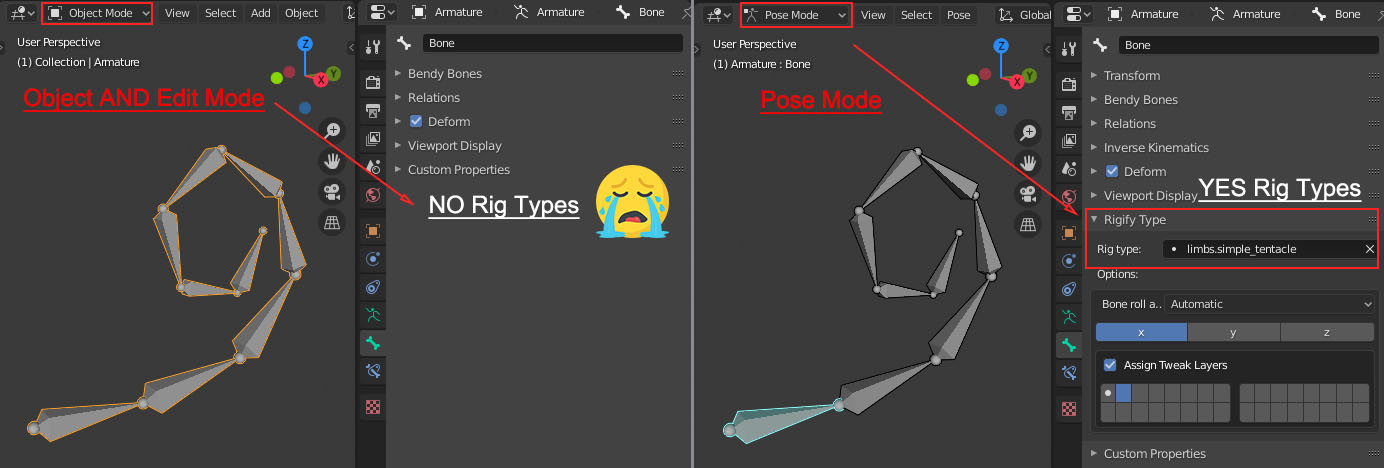
The Rigify Buttons filed is always present but it displays different options depending on the mode. In Object and Pose mode you see the Generate Rig button and Advanced Options. In Edit mode you can access the Rig Type Samples.

Addin a Rig Type sample
The easiest way to create a rig type is through the Rig Type Samples menu. So you’ll need to create an Armature object (Single Bone will do), then switch to Edit mode and go Armature Tab > Rigify Buttons:

Just click on any of the 18 or so presets that you see in the menu, say basic.copy_chain, then click Add Sample. If you did, congratulations! 😀 You just created a Rig Type/Building block. By extension you also created a “Meta Rig” (rename your armature “my_metarig” if you want! 🙂 ).
If you go to Object or Pose mode, the menu will change back to displaying the Generate Rig button. Press it and the addon will generate a custom Rigify rig. Admittedly, not a very functional one but a rig nonetheless.
Setting up a Rig Type from scratch
The samples are very handy but they have the same drawback as using the prebuilt meta rigs. They give you a preconfigured version of a Rig Type. If you are only using the samples you’ll be missing out on all the cool customizations that can be achieved if you delve a bit deeper into the additional options.
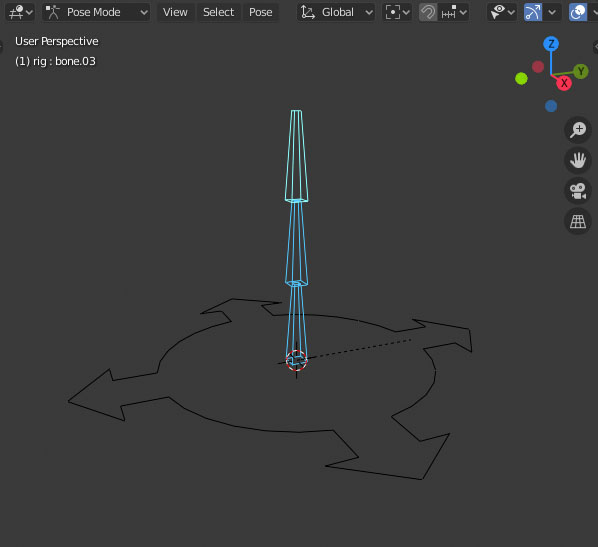
So let’s create a Rig Type from scratch. Select to the simple Meta Rig you created a minute ago and enter Edit Mode. Press Shift+A to create a new bone. It will probably overlap with the Rig Type sample we created so move the new bone to the side. Right-click, choose Subdivide, and set the divisions to 3 (this is a bit different compared to the video demo on purpose).
Now select the first bone in this bone chain, switch to Pose Mode and navigate to the Bone tab. Finally we get to play with the Rigify Type area. This is probably the most important area to understand at this stage!

Click in the Rig Type field and from the drop down menu choose basic.copy_chain (same as the sample). Again, congrats! You just created a custom Rigify Type.
Once the Rig Type is set up you’ll notice a few options displayed below it. Here you can customize the behavior of your Building block. We’ll touch upon these in the upcoming chapters. If you want to understand every single option, currently your best shot is the official Rigify manual. You can also learn by trial and error (I did that a lot).
PLUG TIME 😀 I am working on an even better option (IMHO 🙂 ). As part of my Advanced Rigify series I am creating a video manual that will explain every Rig Type option, even the ones that are not covered in the official manual.
And this is how you create a custom Building Block for Rigify. If you select the fist bone of the sample chain, you should see it has the same Rig Type and options. Adding a sample is just a shortcut that creates bone(s) and sets up the Rig Type automatically.
To Sample or Not to Sample
Should you use samples or create your Building Blocks from scratch?
In my option, it does not matter, as long as you understand how the Rig Type is applied. The basic.copy_chain is a good example of a Rig Type that can be created from scratch, as it is a simple chain of bones. While the basic.copy_chain sample creates three bones, this rig type can work with a bone chain of 2 or more bones.
The Face Rig Type on the other hand is a Building Block that you should never try to build from scratch. This preset has too many intricacies and rules and you’ll definitely make some sort of mistake. I personally don’t know and don’t care how to create it from scratch.
The Leg rig type has a heel bone (that we explored in the video to chapter 3-1). It’s not too difficult to create from scratch but it may lead to problems so in most cases just add a sample and align it with your character.
In the next session we’ll put this knowledge into practice and and we’ll create our own rig starting from a single bone.

So, I went through and generated rigs on each of the rigify samples, one at a time, on that Blend file you supplied.
(Only had to apply Scale to the limbs.rear_paw, and put all origins on the World Center).
I think it helped me understand them a bit better.. recognizing the Generated rig handles (except for a couple I hadn’t seen before).
It also made me realize I don’t understand how each handle should be used properly.. Hope one of the upcoming videos get’s into that.. Like Scaling the Handle projecting from the fingers, causes them to curl. I know that would seem obvious to many, but it took me awhile to catch that it was the scaling command (in local) which was doing that.
Yeah, there are hidden features like that. I have explained most in the full course (“Manual” chapters)
Kinda weird though.. the rig types have changed slightly in version 2.93.7.. they added a limbs.front_paw, and changed the limbs.rear_paw so that it no longer includes “fingers” on it. I don’t see any other changes, but then again, I’m pretty new to this.
Experimental.super_chain, whenever I hit the add sample button for it, it made all the other samples I’d added to that rig, just vanish. If I hit undo, it made the new sample disappear, but all the other samples I’d brought in, were still gone. I had to do the Undo about 4 times before the rig reappeared, but it would also remove anything else I’d done in those steps prior to putting in the super chain.. I did it a few times, using “revert” to get to the saved point directly ahead of the glitch, with the same thing happening each time.. but ONLY if I tried the experimental super chain.
That sounds strange. I haven’t seen this glitch and I have seen many haha
Can you share a blend file and/or steps to reproduce the issue?
Watching this in 2022 it’s the best rig video on the planet. Thank you, man.
Really glad you appreciate it. It’s not the most popular video but one of the most important ones in the series in my opinion.
Thank you for the informative crash course, I am wondering if problems occur if i delete bone groups. I am rigging a face and I don’t have a nose or ears, do you know if problems occur if delete parts of the face. I plan to use Blendartrack for the animation of my model. Thank you.
Hi. Generally, yes. Deleting bones is a problem, especially in 2.93 and earlier. In 3.0 the face was updated and is a bit more forgiving but still not perfectly intuitive. Here is a video about the new face (you have to use the “Upgrade” button to get the new rig)
https://www.youtube.com/watch?v=wVISTf93uTA
And here is a quick video about how to troubleshoot problems with this new rig
https://www.youtube.com/watch?v=hYDzW3RBUqY
So after you “upgrade” to the new face, deleting parts may work although it’s not guaranteed.
Hi Todor,
I can’t find rigify type menu in bone property and rigify button menu in armature tab in Blender 3.5.
Were they moved to somewhere else or are they removed from Blender?
Thanks for the amazing tutorials by the way!
Hi Lex,
Rigify Type has not been moved. You have to be in Pose mode to see it (this has always been the case).
Hope this helps!
Todor
You’ve written terrific content on this topic, which goes to show how knowledgable you are on this subject. Thank you and keep posting good stuff!