
(This article is a part of the Rigify series: go to the overview page so you can start from the beginning. 🙂 )
If you’ve read and understood the information in Chapter 5-1 this section should be a breeze. Here we’ll recreate a Human meta rig starting from scratch. To make it more fun we’ll add custom parts to it: tail and ears.
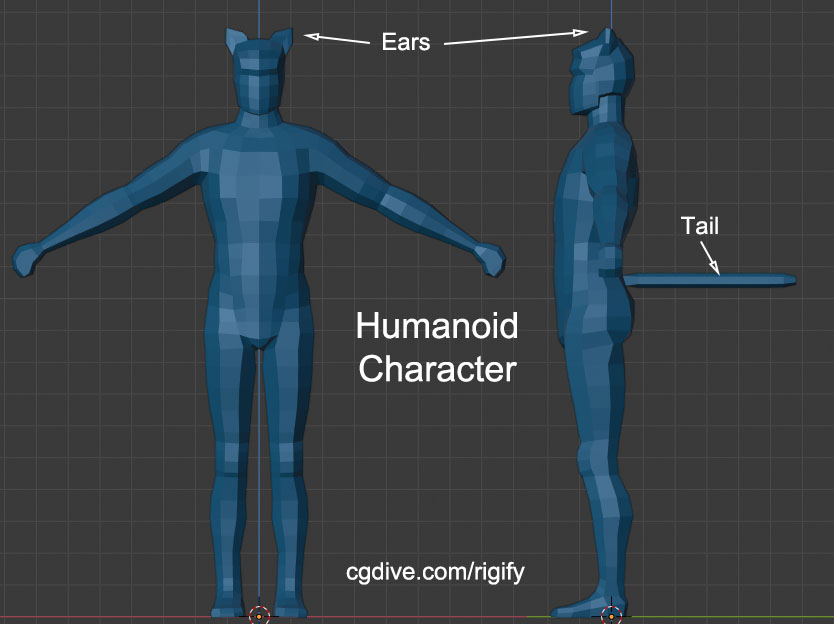
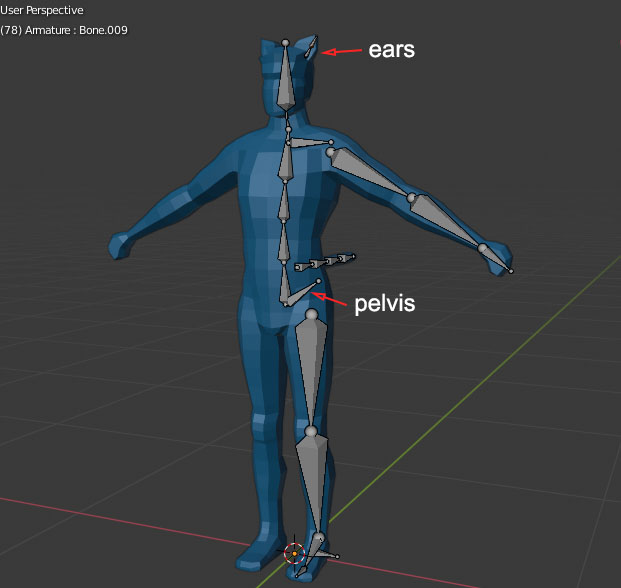
If you haven’t downloaded the free base meshes yet, they are here. Open Ch5_man_tail.blend and you should see this guy:
Ready, set, custom rig!
We could start from the Human meta rig and just add a tail and ears to it. But if you want to practice using Rig Types I highly suggest doing it as described below.
Adding the legs
- In the 3d view press Shift+A > Armature > Single Bone.
- Switch to Edit Mode and delete the bone (we won’t need it).
- Under Properties > Armature tab > Viewport turn In Front on
- Expand the Rigify Buttons (in Edit Mode!), find the limbs.leg sample and click the Add Sample button.
Especially when using the search function make sure you click and highlight the sample you want before you click Add sample.

You should now have a leg armature that’s ready to be used with Rigify. It will need to be perfectly aligned with your character’s limb so make sure you tweak the leg in side and front view. Pay special attention to the heel bone (the small bone that is not part of the Leg chain). It has to be aligned with the heel of the character and in front view, it should be as wide as the characters foot.

Adding the spine
Rather than adding the spine from the samples, let’s do it manually.
- Press Shift+A to create a new bones.
- Press f2 and rename it “spine”.
- Scale it down and place it at the base of the character’s torso.
- Extrude three more bones and you should end up with something like this. (in front view keep the whole bone chain right in the middle)
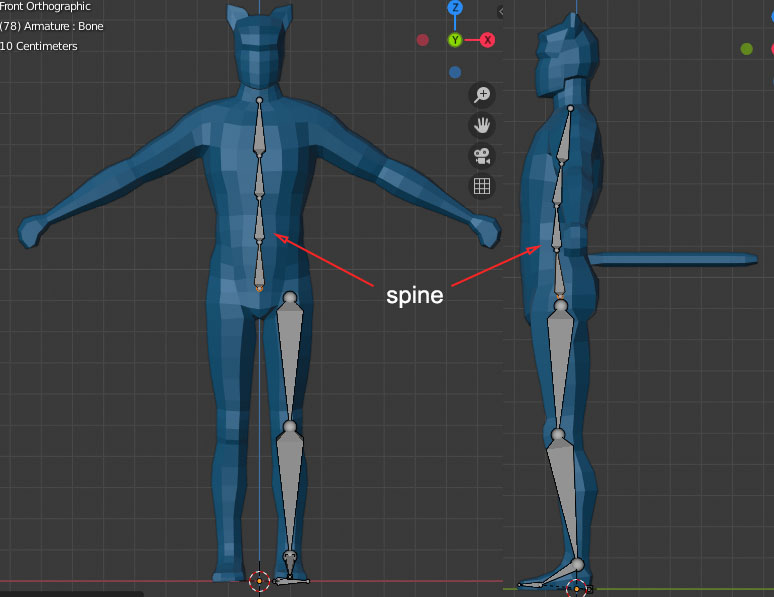
The new chain of bones does not yet have a rig type so Rigify has no idea what to do with it.
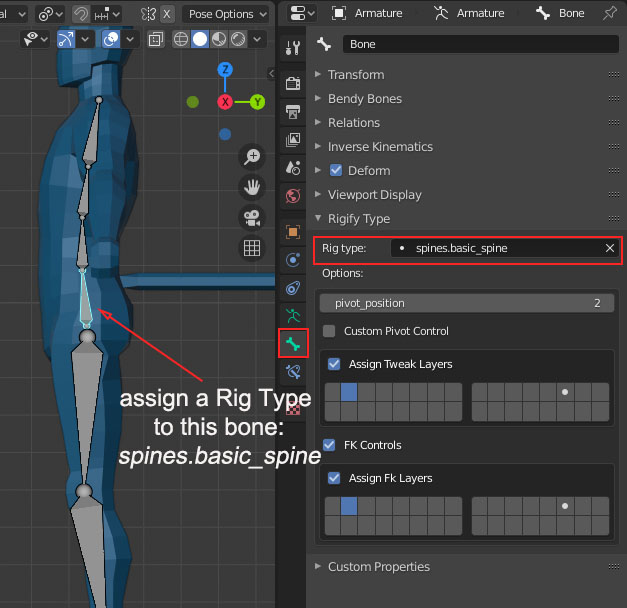
- Select the first bone of the spine and switch to Pose Mode.
- Go to Properties > Bone Tab and expand Rigify Type
- In the Rig Type field start typing “spine” and choose “spines.basic_spine”
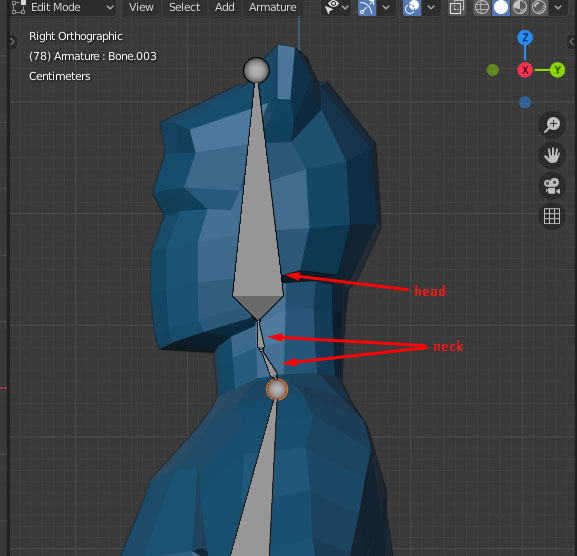
Adding a Head
To add the head we’ll use the samples again. You should know the drill by now. In edit mode, find the spines.super_head sample and press “Add sample”. You’ll get a chain of three bones which you’ll align to your character. The first two bones represent the neck and the big bone at the end is the head.
Adding Arm and Collar bone
To rig the arm, add a limbs.arm sample and align it to the character’s arm. In top view make sure the elbow is slightly bent. This helps Rigify figure out the orientation of your arm.
For the collar bone, you can either add a basic.super_copy sample. Or add a new bone with Shift+A and in pose mode give it a rig type of basic.super_copy. Either way is fine. Rename your collar bone to something like “collar.L” because we are going to symmetrize all bones later.
Your arm and collar bone should look something like this.

Adding a Tail
To create a rig for the tail, add the spines.basic_tail. You used a sample you’ll get a chain of three bones. That’s fine but if you want more flexibility for the tail you can simply extrude one more bone. Alternatively, create a chain of 4 bones and assign spines.basic_tail Rig Type to the first bone.
Then align your tail bones to your character.

Adding Ears and Pelvis
You should know how to do the following by now:
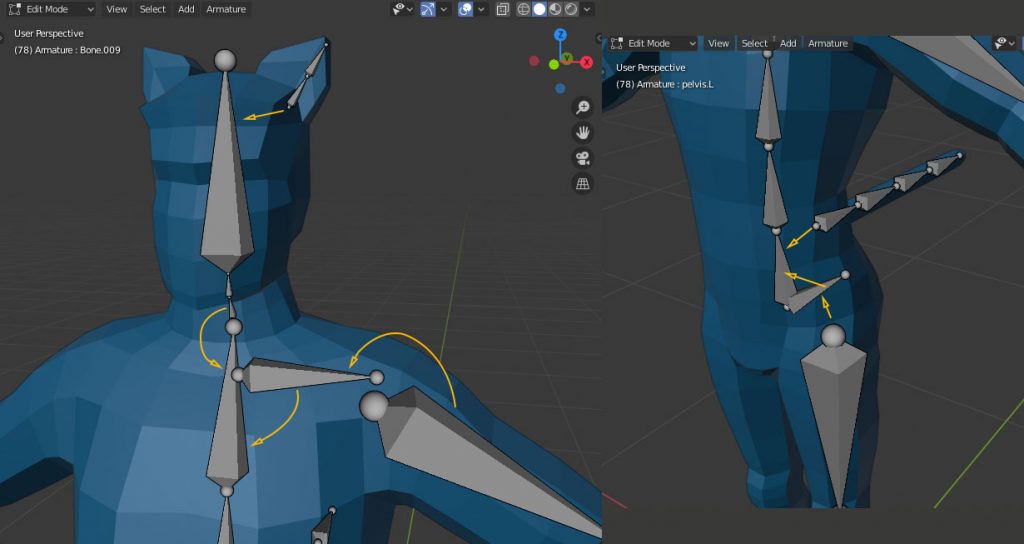
- EARS:
- create a chain of two bones and set the rig type to limbs.simple_tentacle
- add “.L” to both bones so that we can symmetrize them later
- align the bones to the mesh
- PELVIS:
- select the first nodule of the spine and extrude a bone from it
- name the bone “pelvis.L“
- set its rig type to basic.super_copy
Parenting the Rig Types
We now have all the building blocks that we need. All that is left to do is to perform simple parenting. Here is what needs to be parented. Always use the “Keep Offset” option.
- first bone of the ears > head bone
- first bone of the neck > last bone of the spine
- collar bone > last bone of the spine
- arm > collar bone
- tail > first bone of the spine
- pelvis > first bone of the spine
- leg > pelvis
Symmetizing the Rig
If you named everything correctly all you need to do is select all bones in Edit Mode and press Armature > Symmetrize.

Check your Rig Types
When building custom rigify rigs I sometimes experience a strange issue: some of the rig types are “lost” even tho I am fairly certain that I did set them up. I am not sure why that happens. I suspect it may have something to do with the undo operation. In any case, it is a good idea to check each Building block and see if the rig type you want is properly set up. If it isn’t just assign it quickly.
Generate Rig And Parent with Automatic weights
If you followed along so far you should know how to Generate your rig and parent it to the mesh with Automatic weights.
If something isn’t right, go back to your meta rig and check if everything is set up and parented correctly. Feel free to leave a comment if you encounter a problem you can’t solve.
Cha-ching ♪
Congrats, you just built a custom Rigify rig from scratch. A big step towards rigging any character with Rigify.
This is great thank you!
Cheers!
When I brought in the Limbs.leg sample, the Axis layout was different. In 2.93.7 (LTS) the default has the AXIS on the Root of the Bone, rather than the Tip. There’s a slider directly to the left of the selection box labelled “Position”.. if you put the slider to a value of “1.0” it looks like it does in your video… otherwise, it looks like different values at each of the joints.
For example, the joint between the toe and foot bones showed the Z straight up, and the Ankle intersection showed the rotation of the Foot bone, instead of the Shin.
While on the topic of axis rotation.. not sure if this is “new” but if you check the axis on the rig you created, versus the metarig prebuld human, the Z-axis is “up” on the shoulders in the prebuild, and forwards on the one you made. Does that make any difference? I know that Z indicates the direction of travel in some bones (like the legs, the elbows, fingers)..
Yeah, they added the option to move the Axis position in 2.92 I think. It is a nice feature.
As for your other comment:
The axis thing won’t make much of a difference unless you start switching your rig to Euler and manual axis.
An excellent read that will keep readers – particularly me – coming back for more! Thank you and best of luck!