
Table of Contents
- Intro
- Nested Bone Collections
- Bake Action options
- Auto-Keying button
- Add Keyframe / Keying Sets
- Graph Editor
- Weight Paint
- Drivers
- Dope Sheet, Motion Paths
- Rigify
- Auto Smooth and More…
- Other Updates in Blender 4.1
- FAQ
Blender 4.1 Rigging and Animation
Blender 4.1 has brought some exciting updates to rigging and animation. In this blog, we will dive deep into the new capabilities and improvements that have been introduced in the latest version of Blender. From nested bone collections to enhanced bake action options, there’s a lot to explore and learn.
Interested in Blender News?
Nested Bone Collections
In Blender 4.1, nested bone collections have been introduced, allowing for more organized management of Armature hierarchies. That makes it easier to manage and organize your bones.
Creating Nested Collections
You can nest Bone Collections by dragging and dropping any existing collection on top of another collection. Pay attention to the text that appears as you drag the collection. It will tell you whether you are about to actually nest the collection, or simply reposition it above or below another collection.

Visibility Control
You can hide or unhide a collection using the eye icon 👁 next to it. That is the same as in Blender 4.0.
What’s interesting now that we have collection nesting, is that the visibility of a top collection controls the visibility of its children. This means that if the parent collection is hidden, all the bones inside it as well as inside any of the child collections will be hidden.
Solo Visibility
A new feature called “solo visibility” allows you to display only the bones inside a specific collection, ignoring the nesting and displaying only the bones inside the “selected “starred” collection. This provides an additional layer of visibility control. The Star icon ☆ represents “solo” visibility.
It’s important to note that you can “solo” multiple Collections (so the name “solo” does not describe the functionality perfectly).
The nested bone collections are also visible in the outliner, providing an alternative way to manage and organize your bone hierarchies.
Future Improvements
While the nesting feature works well, the current implementation is still slightly lacking in terms of UX. Whether the Collection will be moved above, below or nested inside another collection is indicated by a text pop-up which may be hard to read. There are ongoing developments to make the Collection drag-and-drop functionality more visual and intuitive by using visual indicators for nesting. (see GIF below)
Bake Action options
In Blender 4.1, there have been significant improvements to the “Bake Action” options, offering more control and flexibility when baking animations. Here’s a closer look at the new capabilities:
New Channel Options
The updated “Bake Action” menu now provides new channel option, allowing users to choose which properties to bake, such as location, rotation, and scale and b-bone. This provides a more granular approach to animation baking, making it easier to customize the baking process to suit specific needs.
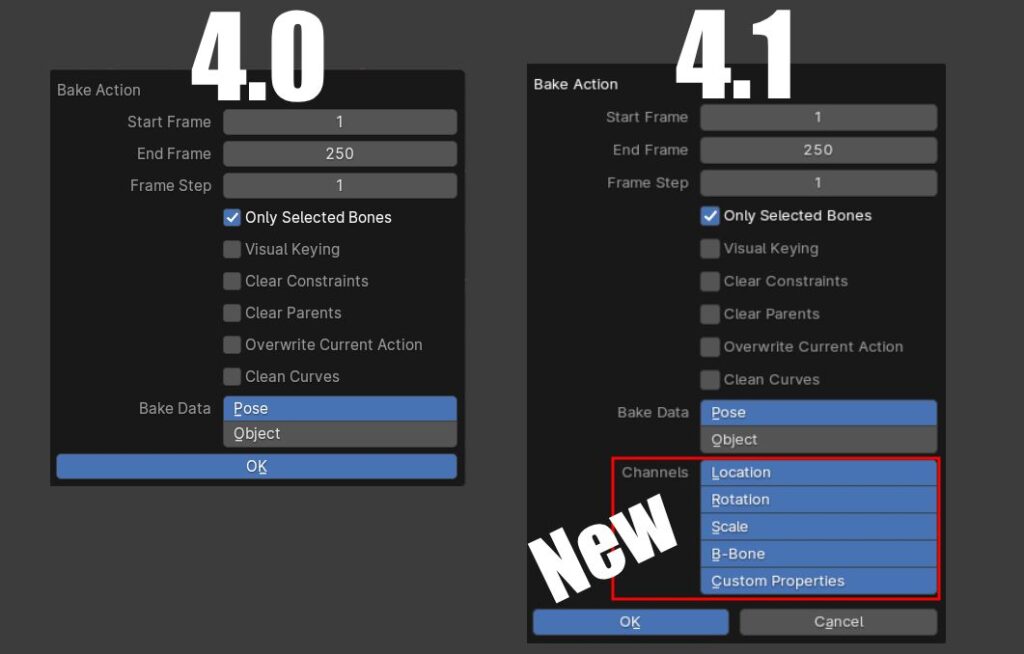
Baking Custom Properties
One of the most significant updates is the ability to bake custom properties, which was previously challenging or impossible in Blender. This improvement allows for more complex animations involving custom properties (such as an IK-FK switch property) to be accurately baked!
Auto-Keying button
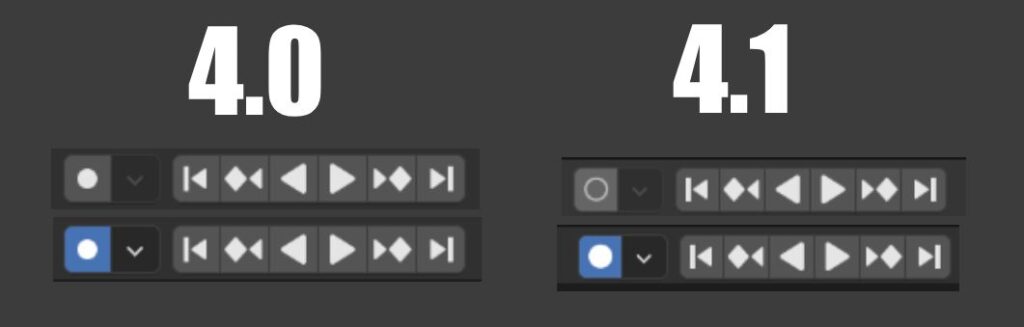
In Blender 4.1, the look of the auto-keying button has been improved: the OFF state of the button is now a hollow circle on a gray background instead of a white filled circle. The ON state is the same as before: a white filled circle on a blue background.
This small but useful change makes it easier to see whether auto-keying is enabled or disabled. This should improve the user experience and help prevent confusion when animating.
Add Keyframe / Keying Sets
Blender 4.1 introduces a new approach to adding keyframes and keying sets, offering more control and flexibility in the animation process. Here’s a closer look at the new capabilities:
Keyframe Insertion
The process of inserting keyframes has been updated in Blender 4.1, with a new distinction between the “I” hotkey for predefined keying sets and the “K” hotkey for the keyframe insertion menu. Now, you can press “I” to insert keyframes for predefined keying sets, or use the “K” hotkey to access the keyframe insertion menu for more granular control.
If you are an experienced Blender animator, this change will break your muscle memory since the “I” shortcut used to bring up the Keying menu.
Graph Editor
In Blender 4.1, the Graph Editor has received several updates and improvements to enhance the animation workflow. Here are some of the key changes and features:
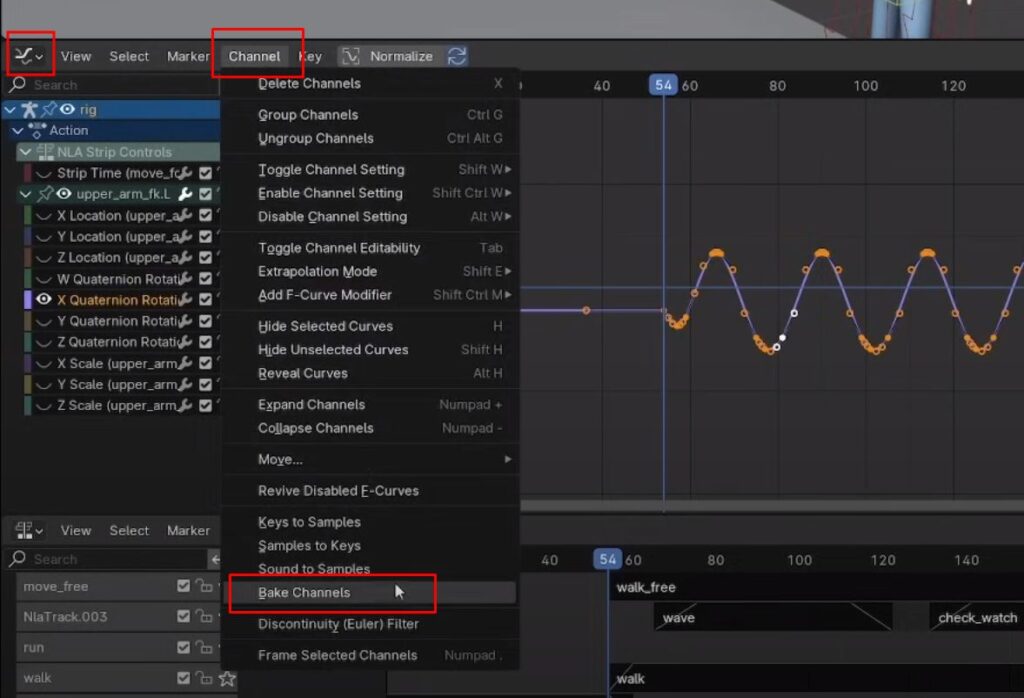
Bake Channel Operation
A new “Bake Channel” operation has been added to the graph editor, allowing users to bake specific animation channels with customizable settings. This feature provides a more efficient way to bake animation curves and can be useful for refining and optimizing animation data.
Auto Lock Key Axis
A new “Auto Lock Key Axis” (Graph Editor Menu > View > Auto Lock Key Axis) option has been introduced, allowing users to automatically constrain movement in the graph editor to specific axes, making it easier to manipulate keyframes with precision.
Scale from Neighbor
Users can now use the “Scale from Neighbor” (Graph Editor Menu > Key > Blend > Scale from Neighbor) feature to scale motion paths relative to the first or last key in the selection (press D while doing the operation to switch between first and last key as a reference point).
Weight Paint
In Blender 4.1, weight painting has seen some improvements, particularly in the selection tools and bone icon visibility. Here’s a closer look at the new changes and features:
Bone Icon and Selection Tools
When weight painting a rigged character, there is now a bone icon to indicate that bone selection is an explicit selection mode. Additionally, new selection tools have been added, such as the box select tool, providing more options for selecting bones in weight paint mode.
The new selection tools may be especially useful for artists who use Blender with a tablet.
Drivers
Blender 4.1 introduces improvements in drivers. Now, Single Property and Context Property Driver variables support a fallback value to use if the calculation of the Driver fails for some reason. In other words, Driver properties can now have default values, which should enhance their reliability.
Dope Sheet
The Dope Sheet in Blender 4.1 may see a performance boost. This should result in smoother and more efficient animation editing and management.
Motion Paths
Additionally, Motion Paths can now be baked in screen space relative to the active camera, providing better animation control.
See this for more information: https://developer.blender.org/docs/release_notes/4.1/animation_rigging/#motion-paths
Rigify
Rigify also sees updates in Blender 4.1, where nested collections can now be used. This new feature allows for more organized and streamlined management of rigging hierarchies. Rigify users can now nest related collections and control their visibility, providing a more organized rigging experience.
Auto Smooth Overhaul
The Auto Smooth auto-smoothing feature has been changed dramatically in Blender 4.1. This substantial update may have a significant impact on character exporting to game engines and other applications. It may require a separate video/blog to fully explore the implications and benefits of this update. Stay tuned!
These are the important updates in Rigging and Animation for the Blender 4.1. Looking forward to 4.2 🙂