
This article is unfinished but the videos are ready to watch
I recommend watching the videos below. Later I’ll finish the written article for those of your who are old-school and like to read 🙂
Rigify helps you build a great rig very quickly. In addition, it also provides tools to make your rig more user friendly through Bone Groups and a handy Layers menu.
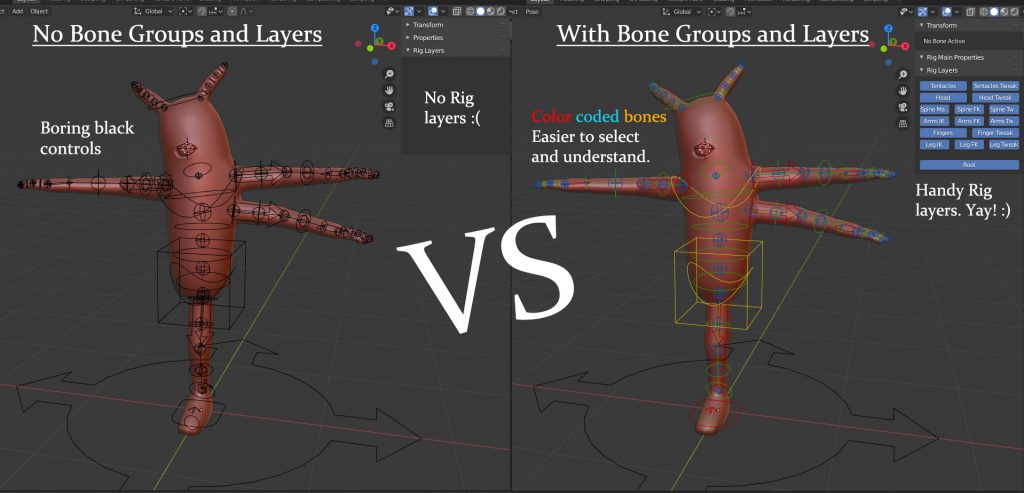
Bone Groups and Bone Layers are standard Blender features. Rigify simply automates a lot of the tedious work that goes into making use of these tools. Let’s look at the default Blender tools first.
Blender Default Armature Layers (Skeleton panel)
When you create and Armature and switch to the Armature tab (aka Object Data Properties) you’ll see the Skeleton panel. In there you’ll find Blender’s layers. Unfortunately, this feature has not been updated for quite a while (the stable version as I write this is 2.83.1). So the layers are represented by squares and their number is limited to 32. There are addons that allow you to at least name your layers but the number of layers is hard-coded. I may cover these addons in the future but hopefully, the default feature set will be improved in the near future and will allow to name and organize the bone layers better.
IMAGE
Armature layers allow you to organize your bones. In Edit Mode or Pose Mode select one or several bones and press M. This will bring up a menu with the same squares that you see in the Properties panel. Click the Square/Layer where you want to position your bones and they will be moved to that layer. A special feature is that you can Shift-Click multiple layers in this menu and the selected bones will show up on all of them. By default only the first layer is visible so when you move your bone they’ll seem to disappear. I’ll explain hiding/showing layers in a second.
IMAGE
Once you move a bone you’ll see that a circle appears in that square (in the properties panel). Only one of circles will be solid, the other ones will be just an outline. The solid circle signifies that the currently active bone is on that layer. There is an exception tho, if the active bone is available on more than one layer, then you’ll see a solid circle all of them.
IMAGE
To show and hide layers you have to Click or Shift-Click on the squares in the Properties Panel.
- when you Click on a layer, you’ll unhide that layer and simultaneously hide all others
- by Shift-Clicking, you can unhide a layer while preserving the visibility of the other layers. Or if you shift-click on a visible layer, that will hide it while preserving the visibility of the rest of the layers.
Blender Default Bone Groups
Bone Groups allow you to group a set of bones. This has two main benefits.
- color code your bones for better visibility
- easily select the whole group of bones at any time
Let’s see how Rgify automates this functionality to improve the usability of the Generated rig
Rigify Bone Groups and Rigify Layer Names
The two panels that you’ll be working with are Rigify Bone Groups and Rigify Layer Names, again under Armature tab. If you are working with a prebuilt meta rig these fields are already set up. However, when you’re creating a custom rig they’ll be empty and you’ll have to configure them from scratch.
IMAGE
Setting up these two fields is optional. This step only affects usability and not functionality. I highly recommend it in rigs that you’ll use for important animations. But you can skip it in quick and dirty test rigs.
Rigify Bone Groups
In this field you can prepare a set of colors that will be used to color-code the Control Widgets in your Generated Rig. How these colors are applied is defined in the “Rigify Layer Names” so we’ll explore that in the next step.
Here is what you can do in this area
IMAGE with numbers
- Add Standard button: add six “standard” colors that are used in all of the prebuilt Meta Rigs. If you want to comply with the “defaults” set by these rigs you can quickly add these colors
- Theme: Choose a “Theme” from the drop-down menu, then press Add From Theme. This will add an additional Bone Group with predefined colors. The problem here is that in the drop-down menus there is no preview of the predefined colors as of this version (Blender 2.83). That makes using this feature kinda pointless.
- Add/Remove Groups
- The “+” Button adds a new Bone Group to the set, the color is set to black so you’ll probably want to change it to something colorful right away.
- The – Button will delete the Bone Group that is currently highlighted.
- And if you click the last button it will display another option: “Remove all Bone Groups”, which will remove any Groups that you may have set up so far.
- Tools to unify the selected/active bone colors
- Color to apply as a “selected color”
- Color to apply as “active color”
- Restore Rigify’s default “selected color”/”active color”
- Locks the “selected color”/”active color” for all Bone Groups in the menu below it.
- Applies the “selected color”/”active color” to all Bone Groups in the menu below it.
Rigify Layer Names
Coming soon…
Dude, you’re doing really great work! After I watched some of your videos on YouTube I a few ideas popped up in my hand. Those were making explanations of every rig type, including images, advices how to use them and place properly, image-examples of using in real projects. But then I came to your website and realised that you are already working on manual, which is quite the same what I wanted!
What I really want to see is more examples of using rigify for different characters/creatures with some explanations. Don’t you think about creating some sort of a rigging examples library?
P. S. At this moment I am working on my antro cat character and your videos came really useful. I combined together human skeleton, cat tail and paws, but the problem was that the tail rotated only in one direction. Your videos helped me to fix this. Also I have some other characters which I made before, but can’t rig them properly. So I have a lot material to practise.
Hey there.
So yes, I also had the idea of explaining every rig type and I already did it actually. The manual is complete and available for purchase.
“more examples of using rigify for different characters/creatures with some explanations”: I am also working on that! The first advanced session is almost done. It shows how to rig a dragon with custom face rig.
The manual and advanced sessions are currently available at a discount. Just see: https://cgdive.com/rigify
I am glad the videos have been helpful. I just released a video on posing if you haven’t seen it.
https://cgdive.com/rig-anything-with-rigify-8-posing-with-rigify/
Would love to see the stuff you’re working on.
Cheers,
Todor