
Table of Contents
- Introduction
- Bone Collections in Blender 4
- Bone Colors and Custom Properties
- Weight Painting Updates
- Changes in Key Mapping for Weight Painting
- Pose Library Enhancements
- NLA Strip Improvements
- Graph Editor Enhancements
- Save Incremental and Key Mapping Changes
- Rigify Integration and Updates
- Upgrading Rigs and Compatibility
- Other Blender 4 Updates
- Supporting Blender Development
- FAQ
Blender 4 Updates in Rigging & Animation: Introduction
Blender 4.0 has introduced a range of new tools and updates that are designed to enhance the rigging and animation features of the software. From bone collections to bone colors, the changes in Blender 4 aim to streamline the rigging and animation process, making it more intuitive and efficient for users.
In this blog, we will dive into the key updates related to rigging and animation in Blender 4 and explore the new features that have been introduced in this major release. Additionally, we will touch upon changes in the key map, pose library, and other enhancements that have been made to improve the overall user experience.
Bone Collections in Blender 4
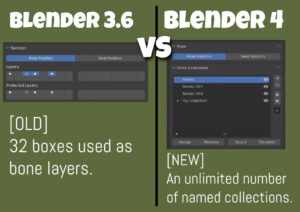
Blender 4 has introduced a new feature called Bone Collections, replacing the old system of layer boxes. With Bone Collections, you now have the flexibility to create as many collections as you need, making organization and management of bones more intuitive and efficient.
In Blender 4, you can easily assign bones to collections by selecting the desired bones in Edit mode or Pose mode and moving them to the collection of your choice (shortcut: M). You can assign a bone to multiple collections (shortcut: Shift + M), making it easier to categorize and group bones based on your rigging needs.
You can hide or unhide all bones assigned to a collection by clicking the Eye icon 👁 next to each Collection.
You can even add custom properties to bone collections. This provides a new level of control and organization for rigging and animation projects.
With Bone Collections in Blender 4, rigging and animation tasks become more streamlined and user-friendly. The elimination of the previous 32-layer limit makes it easier to manage complex rigs and animations. And Blender 4.1 which is scheduled for release soon will introduce nested bone collections! These changes in Blender 4 and beyond aim to enhance the overall user experience and empower users to create more intricate and dynamic rigs with ease.
Bone Colors
In Blender 4, bone colors have received a significant update. You can now assign custom colors directly to a bone instead of using the old Bone Groups feature. In fact, Bone Groups have been deprecated and they don’t exist in Blender 4 anymore.
To assign a bone color, go to Bone tab > Viewport display and you will find Bone Color (=bone color in Edit Mode) and Pose Bone Color (=bone color in Pose Mode).
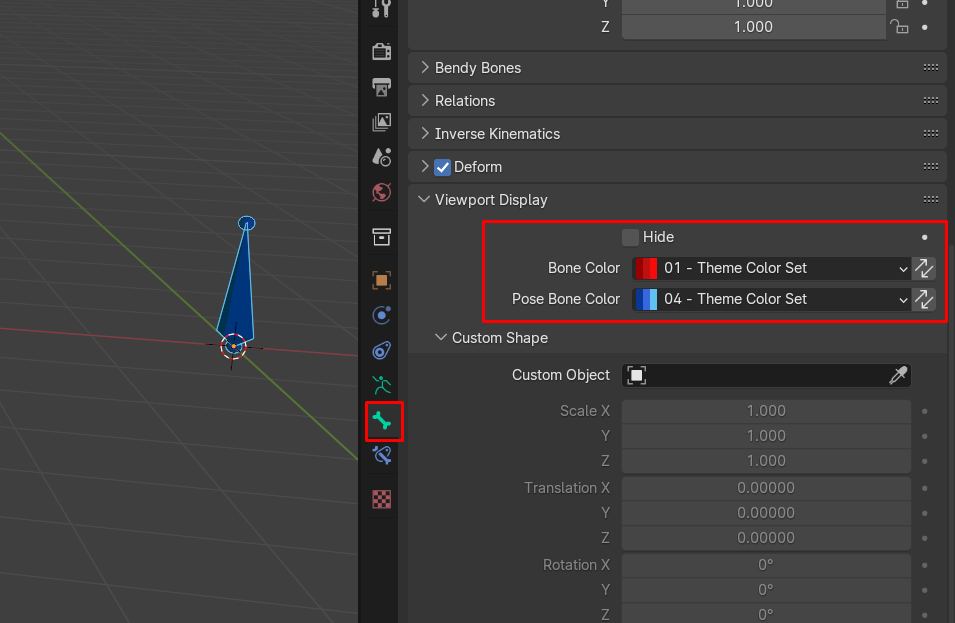
So custom colors are now also visible in Edit mode, which was not possible before!
Weight Painting Updates
In Blender 4, there have been significant changes to the weight painting process that users should be aware of. The keymap for selecting bones in weight paint mode has been updated:
- Alt + Click to select a bone (used to be ctrl+click)
- alternatively you can use ctrl + shift + click. This may be useful to tablet users.
- Alt + Shift + Click to select multiple bones. (used to be ctrl+shift+click)
Additionally, the behavior of the Draw Brush in weight paint mode has been improved. Users can now easily add, remove, or blur weights by simply clicking, Ctrl + Clicking, or Shift + Clicking, respectively. These changes make it easier for users to manipulate weights in their meshes, providing a more efficient workflow.
Furthermore, you will notice changes to the vertex selection modes in weight paint mode, with shortcuts now assigned to selecting faces and vertices.
- shortcut “1”: Face Selection mode
- shortcut “2”: Vertex Selection mode
Pose Library Enhancements
In Blender 4, the Pose Library has received a notable update with the introduction of a new Shelf for poses. This Shelf allows for easy access to poses and can be expanded or adjusted to suit your needs.
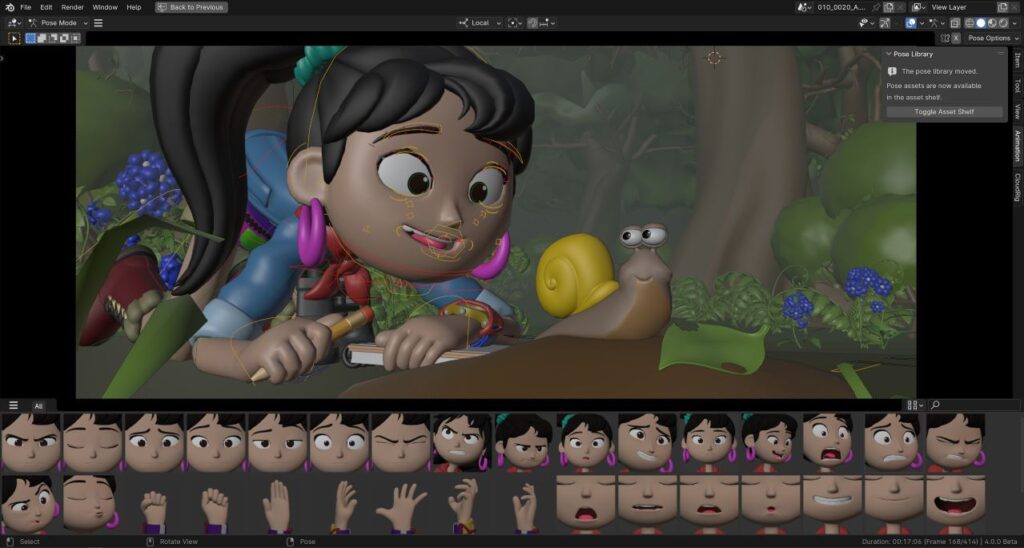
Previously located under the N-panel, the Pose Library in Blender 4 has been moved to a more accessible location. To enable the Pose Asset Shelf, select an Armature and go to Pose Mode, then click on the small button that appears in the lower right of the 3D View:
The new Pose Library Shelf in Blender 4 offers a more visually intuitive way to interact with poses, making it easier to organize and access your animation poses.
NLA (Non Linear Animation) Improvements
When working with NLA strips in Blender 4, you’ll notice an improvement in the ease of reorganizing your animation sequences. Previously, moving strips around could be cumbersome, with Strip getting blocked by other existing strips for no apparent reason. But now you can simply select a strip and press ‘G’ (or just click and drag) to move it freely to a new position.
Another notable enhancement is the ability to move strips through locked tracks without any issues. Attempting to place a strip on a locked track won’t work of course. Instead the strip will be intuitively placed on the nearest unlocked track.
Furthermore, the Tab key is now assigned to full stack editing, allowing you to see the influence of both the tracks above and below the action you are editing. Tab used to be set to lower stack editing due to a deeper underlying problem which has been resolved in Blender 4.
Graph Editor Enhancements
Blender 4 introduces significant performance improvements to the Graph Editor when working with dense graphs containing many curves, keyframes, and transform channels. Additionally, a new smoothing algorithm called Butterworth has been implemented, providing users with more control and flexibility when working with complex animations.
Another update in the Graph Editor is the ability to update multiple curve modifiers simultaneously. Users can now select multiple curves with the same modifier and adjust parameters across all selected curves at once, streamlining the editing process and improving workflow efficiency.
Save Incremental and Key Mapping Changes
Blender 4 introduces the handy Save Incremental feature, allowing users to easily save multiple versions of their project with just a click of a button. By going to File and selecting Save Incremental, a number will be added to the file name, updating each time you save incrementally. This feature is incredibly useful for version control and preserving different iterations of your work.
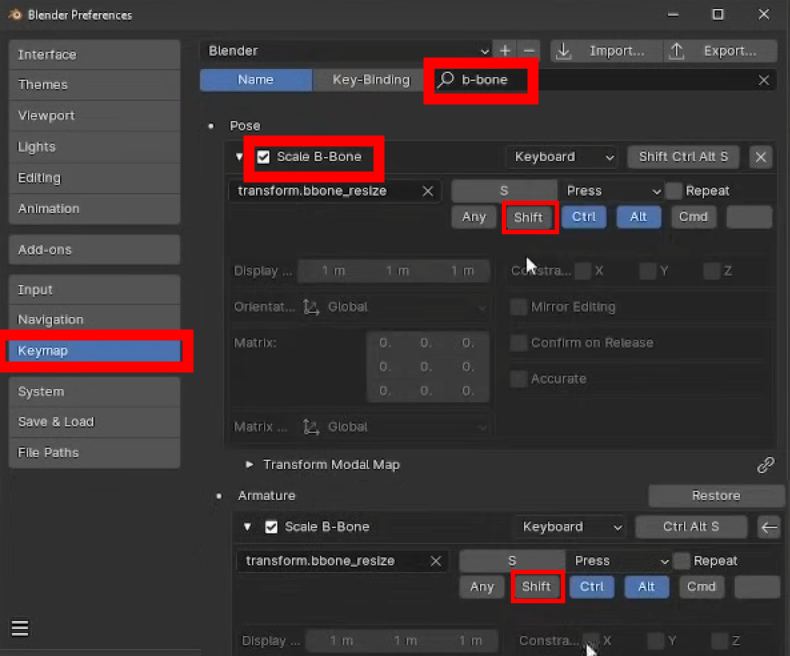
However, there have been changes in the key mapping that may affect your workflow. For example, the shortcut for adjusting the thickness of a B-Bone used to be ctrl + Alt + S, but it has now been changed to ctrl + Alt + Shift + S. This alteration may be extremely cumbersome if you frequently use this feature in your rigging process.
You can customize it by going to Edit Preferences, Key Map, and adjusting the shortcuts to better suit your needs.
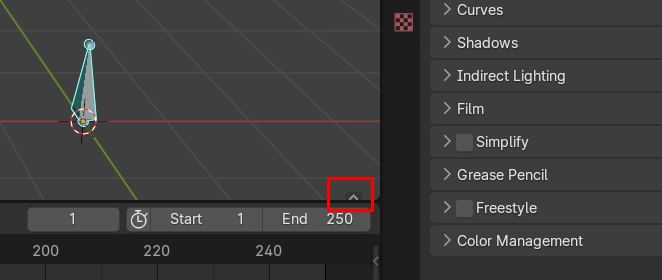
If you would like to use ctrl + Alt + S to scale B-Bones, I recommend the following keymap adjustments:
- disabling the shortcut for Incremental Save (having as a shortcut is not vital)
- Set the B-Bone scaling shortcut to ctrl + Alt + S. You can use the screenshot below as a guide:
Rigify Integration and Updates
The basic Rigify workflow remains familiar, allowing users to quickly set up rigs for their characters.
However, when transitioning Rigify rigs from older versions of Blender to Blender 4, you may encounter compatibility issues. While the rigs will mostly work, the rig layers may not be visible due to the changes in bone collections. To address this, Rigify will display an Upgrade Metarig button under the Armature tab. Press the Upgrade button, then re-generate the rig. So as long as you still have your metarig, you should be able to transition your existing rigs seamlessly to Blender 4.
As with any major release, breaking changes are to be expected, especially when it comes to rigging. Users should be prepared to troubleshoot and adapt their rigs when migrating them to Blender 4. Pierrick’s guide for upgrading non-Rigify rigs from Blender 3 to Blender 4 can provide valuable insights and assistance in navigating any compatibility issues that may arise.
Supporting Blender Development
Blender 4 updates bring a range of new features and improvements that enhance rigging and animation capabilities. As a Blender user, supporting the development of the software is essential to ensure ongoing updates and enhancements. By joining the Blender Development Fund or becoming a Blender Studio member, you can contribute to the continued growth and improvement of Blender.
Supporting Blender development helps fund the work of developers, designers, and artists who contribute to the software’s development. Your support enables the team to implement new features, improve existing tools, and enhance the overall user experience. By joining the Development Fund or Blender Studio, you can access exclusive content, tutorials, and resources while also playing a crucial role in the future of Blender.
By investing in the development of Blender, you help shape the direction of the software and empower the community to create amazing CG projects.