
Table of Contents
- Introduction
- Getting Started with AccuRig
- Using AccuRig to Rig a Custom Character
- Finalizing the Character and Rig
- Exporting the rigged character
- FAQ
Introduction
AccuRig is a stand-alone software designed for easy rigging (auto-rigging) of humanoid characters. It is part of the Actacore family of products and is completely free to use. AccuRig offers a user-friendly interface and seamless integration with popular animation software like Blender, Maya, and game engines. In this blog, we will explore how to rig characters using AccuRig and convert the automatic rig to a Rigify rig in Blender.
Getting Started with AccuRig
To get started with AccuRig, you’ll need to download and install the software from the official website.

Once installed, simply launch the software. The first time you start AccuRig, you will be asked to login or create an account. Creating an account is optional but some features may be disabled if you are not logged in (e.g. registration is required to enable export features). You can easily log in using your Google account.
Auto-Rigging a Sample Character
Before diving into rigging custom characters, let’s quickly demonstrate AccuRig’s capabilities using one of the sample files provided. Simply go to the “File” menu and select “Load Sample Character.” Choose any of the available OBJ files then follow the automated rigging process
- Click Rig Body
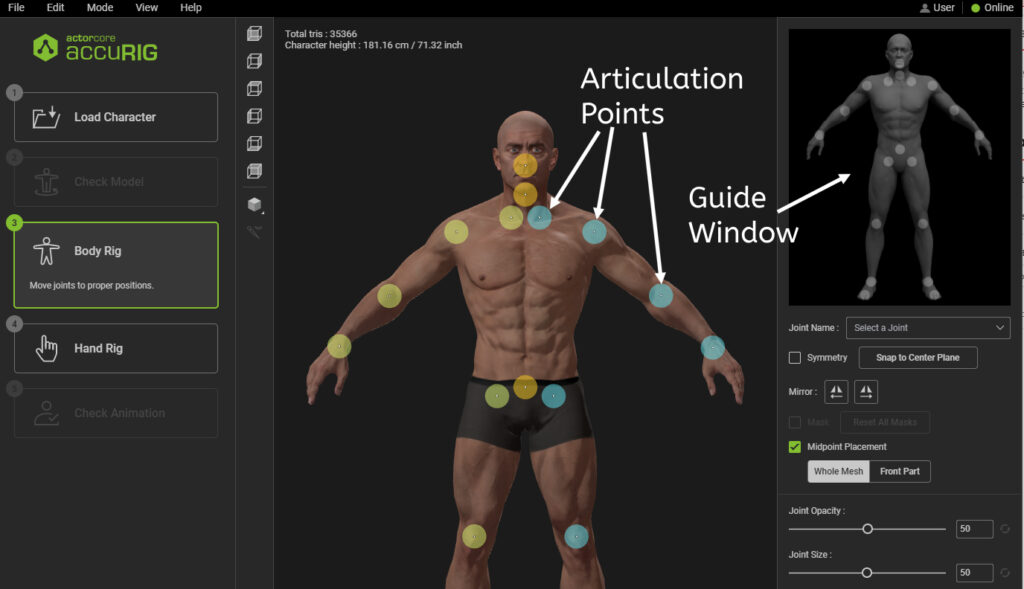
- Adjust the articulation points on the body (use the image on the upper right as a guide)
- Click Rig Right Hand (Number of fingers will generally be 5 unless you have a cartoony or alien character)
- Adjust the articulation points on hand
- Click Rig Left Hand
- Adjust the articulation points
- Click Finalize Character
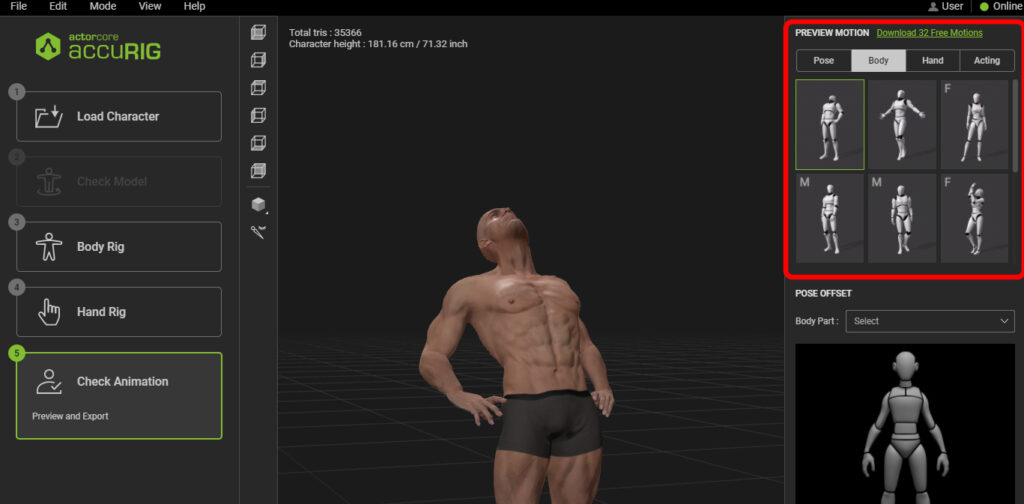
- Apply an animation from the Preview Motion area in the upper right to test the character’s Deformations.
Using AccuRig to Rig a Custom Character
AccuRig makes it easy to rig your custom character for animation. Whether you’re working on a game or a movie, AccuRig offers a user-friendly interface with various features that simplify the rigging process. Here’s a step-by-step guide on how to use AccuRig to rig your custom character:
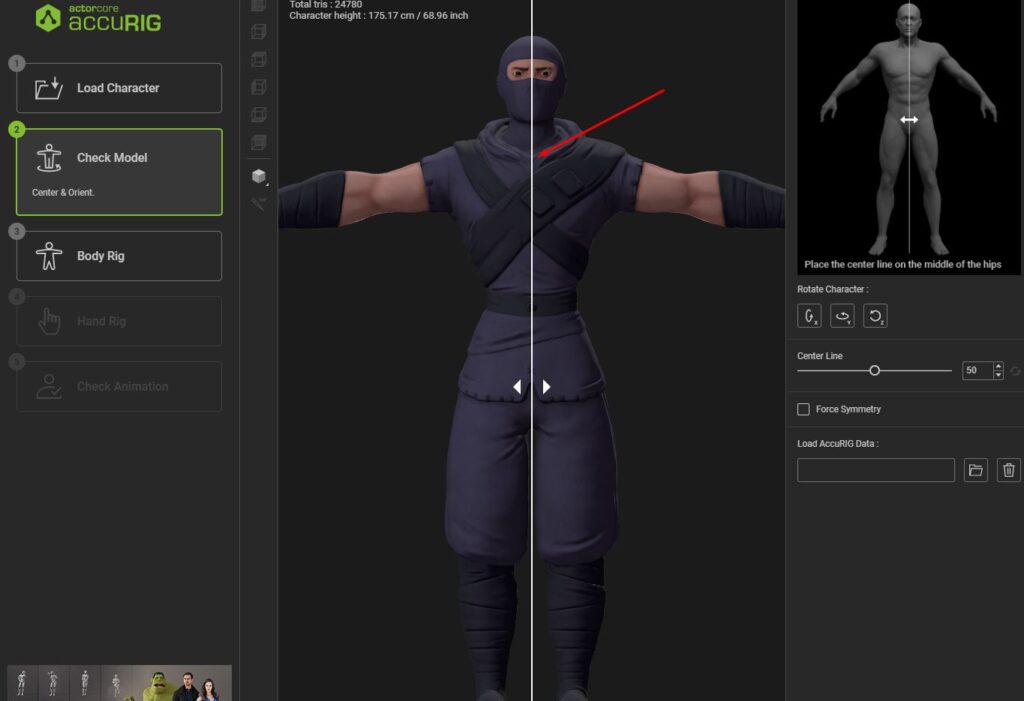
Importing a custom character and setting the symmetry
To start, import your custom character into AccuRig. To do so go to the “File” menu and select “Load” (shortcut: Ctrl+I). The software supports import through OBJ or FBX.
AccuRig automatically detects the symmetry but in case it is off, you can adjust it using the Symmetry line.
From this point the semi-automatic rigging process is the same as rigging one of the sample characters.
Adjusting the articulation points on the Body
While AccuRig does a good job of automatically placing the articulation points, it’s important to double-check and adjust them if necessary. AccuRig provides a diagram that shows the ideal placement of markers for each body part. Simply click and drag the markers to align them correctly. You can also enable the symmetry feature to automatically mirror the adjustments to the opposite side of the character.
Tips for aligning specific body parts (knees, clavicle, etc.)
Certain body parts, such as knees and clavicles, require special attention when aligning the markers. To ensure accurate alignment, switch to side view for knees and use the provided diagram as a reference. For clavicles, use the diagram to determine the ideal placement and adjust the markers accordingly.
Rigging the hands and fingers
AccuRig offers a convenient and intuitive way to rig the hands and fingers of your character. However, it’s essential to manually fine-tune the finger markers to ensure they are accurately placed. The provided diagram and highlighted markers make it easy to identify and adjust each finger individually.
Finalizing the Character and Rig
Now that we have gone through the process of rigging our custom character using AccuRig, it’s time to finalize the character and rig. This final stage involves testing the rig and animation with sample poses, exporting the character, retargeting animations, and making any necessary custom weight painting adjustments.
Testing the Rig and Animation with Sample Poses
Once the rigging process is complete in AccuRig, it’s important to test the rig and animation with sample poses. This way you can ensure that the character moves and bends as intended. You can preview the rigged character in the viewport and try different poses and animations. By testing the rig with sample poses, you can identify any areas that may need adjustment or fine-tuning.
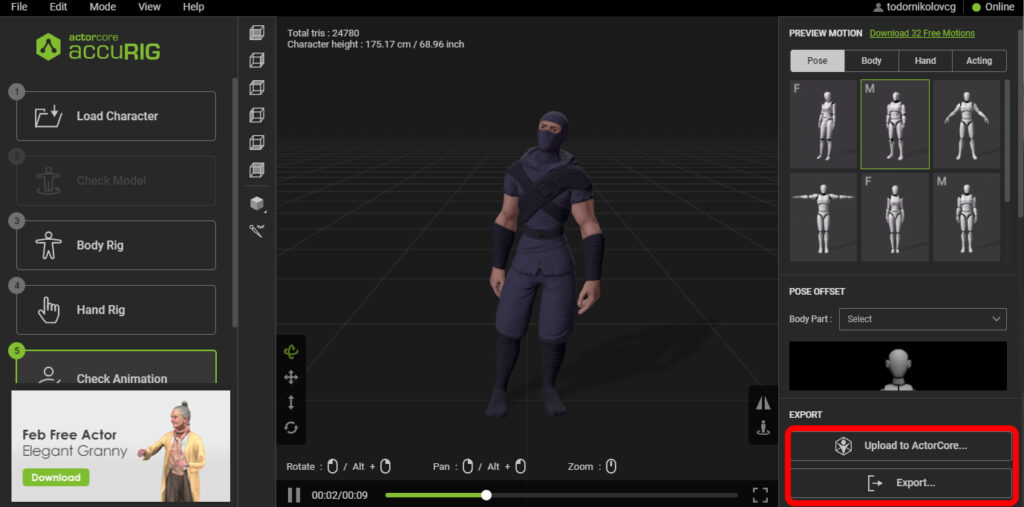
Exporting the rigged character
If you are happy with the rigging and weighting of your character, you can now export the rigged mesh out of AccuRig by using the Export menu in the lower right of the interface. You can the options to “Upload to ActorCore” or “Export…”. The latter gives you various options including FBX export which allows you to get your character into Blender, Maya, and most other 3D suites.
Exporting the Character to the Actorcore System
AccuRig allows you to export your rigged character to the Actorcore system. This system provides a wide range of motion animations that you can apply to your character. By exporting your character to the Actorcore system, you can access a library of actions and apply them to your character for more dynamic and diverse animations. Simply click “Upload to ActorCore” and follow the export process in AccuRig to transfer your character to Actorcore.
Retargeting Motions from Actorcore to the Rigify Rig in Blender
If you prefer to work in Blender, AccuRig provides a special Blender add-on called CC Blender Tools. This add-on allows you to convert the automatic rig generated by AccuRig to a Rigify rig in Blender. With the Rigify rig, you can easily animate the character and retarget motions from Actorcore to the Rigify rig. This gives you the flexibility to work with AccuRig and Actorcore while still using the powerful features of Blender.
Custom Weight Painting and Further Adjustments
After finalizing the rig and animation, you may find that some areas of the character’s mesh still require additional adjustments. This is where custom weight painting comes into play. In Blender, you can use weight painting tools to manually adjust the weights assigned to specific vertices of the character’s mesh. This allows for more precise control over how the character deforms during animation.
CGDive Academy (shameless plug 🙂 )
For those looking to further enhance their skills in Blender rigging and animation, CGDive Academy offers related courses and resources. These courses provide advanced techniques and insights into optimizing animation workflows.
Conclusion
By following these steps to finalize the character and rig, you can achieve professional-quality rigging for your custom character. AccuRig’s user-friendly interface, automatic symmetry detection, and adjustable markers make the rigging process easier and more efficient. Whether you’re a beginner or an experienced animator, AccuRig simplifies the rigging process and allows you to bring your characters to life with ease.
FAQ
Q: Is AccuRig free to use?
A: Yes, AccuRig is completely free to download and use.
Q: Can I use AccuRig with other animation software?
A: Yes, AccuRig is designed to work with popular animation software like Blender, Maya, and game engines.
Q: Are there any limitations to AccuRig’s auto-rigging capabilities?
A: AccuRig performs well with T-pose, A-pose, or relaxed A-pose characters. For more complex characters or specific requirements, additional manual weight painting may be necessary.
Can AccuRig be used for non-human characters or props?
AccuRig is primarily designed for rigging humanoid characters. While it can be used for some non-human characters or props, it may not provide optimal results. It is recommended to use AccuRig for rigging human-like characters for the best outcome.
Is it possible to create a face rig with AccuRig?
Currently, AccuRig does not have the capability to create a face rig. It focuses on rigging the body and limbs of humanoid characters. If you require a face rig for your character, you would need to use other software or techniques to rig the facial features separately.
How to apply Actorcore motion capture data to the rigify rig?
To apply Actorcore motion capture data to the Rigify rig in Blender, you can use the CC Blender Tools add-on provided by AccuRig. After converting the automatic rig generated by AccuRig to a Rigify rig, you can import the Actorcore motion capture data as an FBX file into Blender.
Once the motion capture data is imported, select the Rigify rig and go to the CC Pipeline tab in the N-panel. Under the Rigging and Animation section, choose the source armature and action for the motion capture data. Preview and adjust the retargeting settings if needed, and then bake the animation onto the Rigify rig to finalize the process.
Can custom weight painting be done in AccuRig?
No, AccuRig does not currently have a feature for custom weight painting. However, once you have exported the rigged character to Blender, you can use Blender’s weight painting tools to manually adjust the weights assigned to specific vertices of the character’s mesh. This allows for more precise control over how the character deforms during animation.